8/12/12

Indy British Motor Days

I stopped in at the Indiana British Car Union Indy British Motor Days held at Lions Park in Zionsville, Indiana. It is an excellent venue for a car show, with plenty of parking and wide open grass fields for the show.
100_6119

My favorite car of the show was this Lotus Eleven Westfield replica.
100_6104

100_5974

100_5973

100_5975

100_6103

100_6097

You gotta love an old Bentley.
100_5982

100_5983

100_6108

A beautiful '79 Bonneville Special, the show is open to British bikes, but this was the only one I saw there.
100_5999

100_6086

100_6082

100_6026

100_5980

100_6046

100_5986

100_5987

100_5991

100_6073

100_6080

100_5992

100_6029

100_6117

100_6091

100_6049

100_6045

100_6024

100_6008

100_6084

100_6010

100_6039

100_6054

100_6027

8/10/12

XS650 engine stand

I needed a bench stand for the engine, so knocked one out this evening. This is a lower frame section from a '75 Suzuki GT250 that I'd put away several years ago since it looked like it would make a nice engine stand, and it worked out.
100_5955

I buzzed a few bits off, and welded a mount on each side.
100_5958

It ain't pretty, but it works.
100_5964

I left the passenger peg mounts on since they let it tip forward for access to the bottom.
100_5967

100_5969

staying busy

I prepped and painted most of the rest of the chassis parts for the XS650 this week.
100_5907

100_5911

100_5913

100_5917

100_5918

100_5923

100_5943

100_5937

100_5946

100_5949

100_5952

8/6/12

fast and easy old motorcycle tire dismounting at home

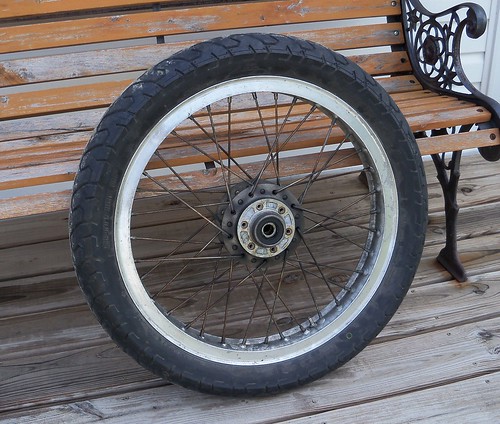
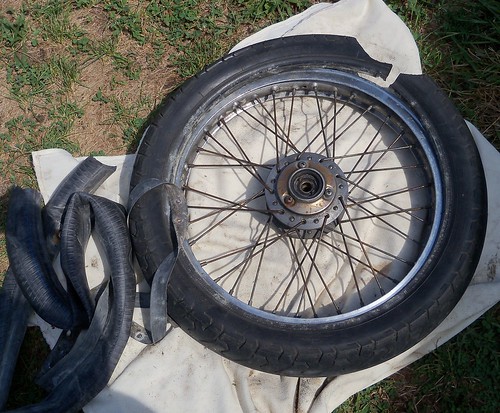
I needed to dismount the tires on my XS650 project. The rims and hubs will be polished, and I'll re-lace with stainless spokes, but first to get the tires off. I don't want to cause any damage to the aluminum shouldered rims, so choose to cut the tires off. I do most all of my own tire mounting and dismounting, and for stiff old tires this is much faster than wrestling around with tire irons. You don't even break a sweat doing it this way.
100_5868

First let the air out, and if it has a tube, remove the valve stem nut.
100_5871

A reciprocating saw with a general purpose blade works best here. It cuts quickly through the bias ply tire.
100_5874

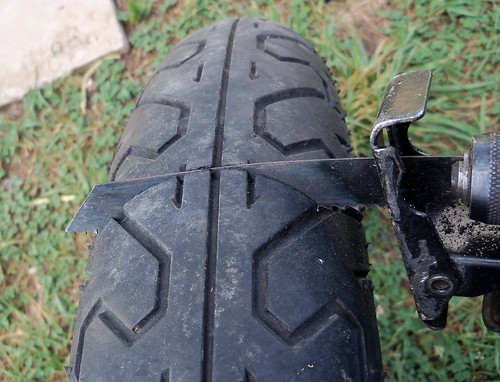
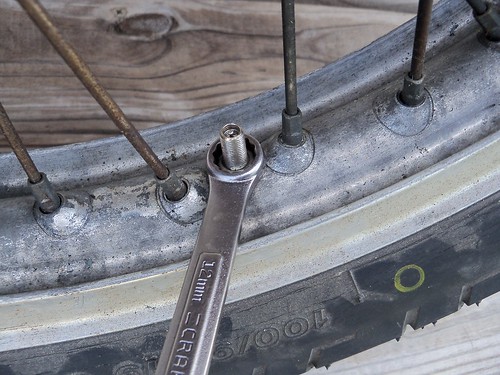
The idea is to cut it as close to the rim as you can, but making sure not to hit it. Then cut the tube and rubber rim strip with a utility knife and push them inside the tire, out of the way.
100_5878

On motorcycle tires I like to use a large C clamp to break the bead loose. I did it near the cut, but it doesn't matter where it is done.
100_5882

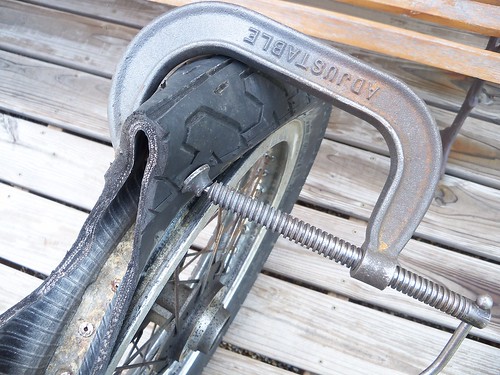
Then lay it down and walk the rest of the bead off, just by stepping on it. Then flip the clamp so you can do the bead on the other side.
100_5883

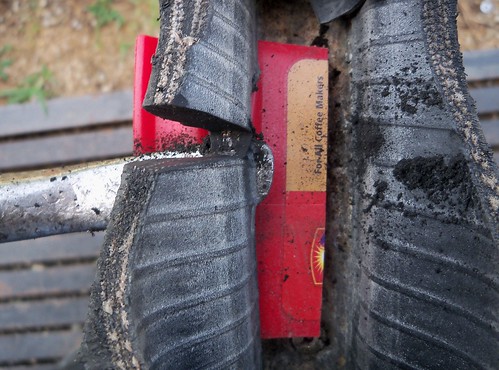
Now to cut the steel bead cord. I like to use an angle grinder with a regular grinding disc for this, but a cut-off wheel would work also. First get the bead of the side that you are cutting as much as possible in the center part of the rim to give you more slack, and use a tire iron to lift up the part that will be cut. Use a rim protector under the tire iron. I'm using one cut from the top of a plastic coffee can here. This is the only time a tire iron is used with this method and since you aren't trying to get the bead over the rim lip, almost no force is used.
100_5892

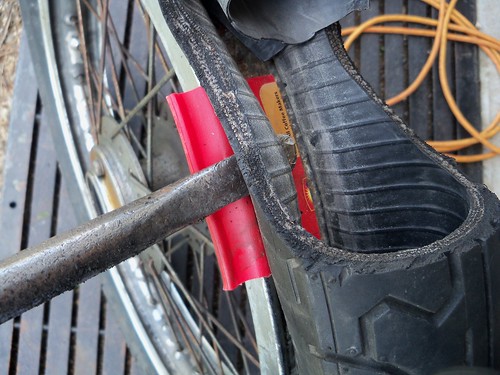
Then cut away, keeping the tire iron between the grinder and rim. When you see sparks you are into the steel bead cord, shown here. Once you cut through the cord you'll see and feel it release. Then just a small amount of rubber to cut. For that a utility knife will work.
100_5896

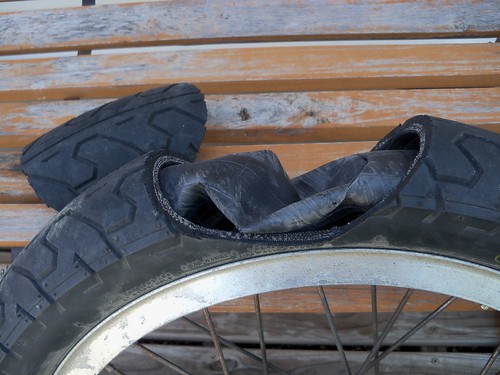
Then just pull the bead off by hand, starting at the cut. Next, pull the tube and rim strip out.
100_5900

Usually the other side will just pull off by hand, like this one did. If not, cut the bead.
100_5901

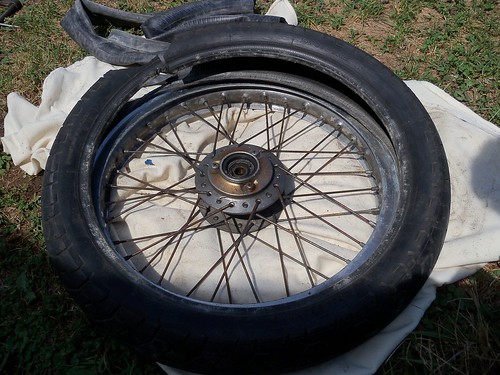
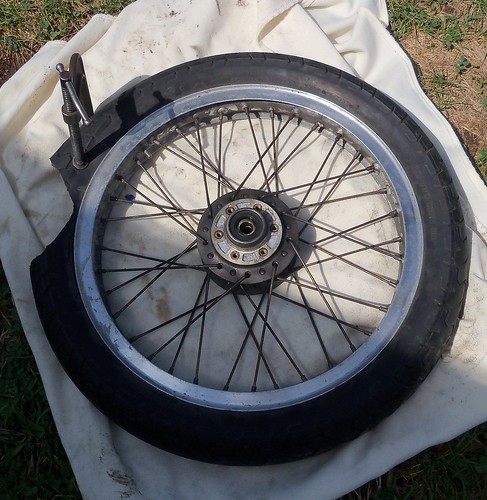
The wheel is ready to disassemble and polish, without even the slightest scratch.
100_5906

8/4/12

staying busy

Now to paint the frame. I got two cans of primer and two of color.
100_5844

First the self-etching primer goes on.
100_5815

I had a quart can of gloss black Rust-Oleum, so brushed it in a few places. Some tight areas are difficult to get into spraying without getting too much coverage in nearby spots, which can cause runs. With the brush you can work the paint into seams and under brackets to make sure there is good coverage. It just makes the spraying easier and faster.
100_5835

I then sprayed the brackets and tabs, and hard to reach areas like the inside of the neck gussets. Some of these, like the side cover tabs, need sprayed from many different angles. The frame tubing itself is the easiest and fastest to paint, and the most visible, so that gets done last. Multiple light coats get the best results.
100_5840

Done! The Rust-Oleum is slow to cure, but since it will be quite a while before the bike gets reassembled it isn't a concern. I will rub it out with a wax after it sits for 30 days or so. This was the biggest chassis part that needed painted, so nice to have it completed.
100_5853

100_5850

100_5854
I had looked into having the frame powder coated, but chose not to. Prices in this area ranged from $150-$200 for just a frame. Blasting and painting myself cost about $40 total for materials, and I have enough paint left over to do many of the other small parts also. Some coaters wanted $80 to do just a swingarm, so quite a savings doing it this way. If the bike was going to be daily transportation I do think the durability of powder coating would be worth the cost. I also knew exactly what I was getting by doing it myself.

8/3/12

staying busy

This week I finish welded a few tabs, and then put the tank and seat on for a last chance look over.
100_5767

This evening I sandblasted the frame, and will paint it in the morning.
100_5781

100_5784

100_5788

100_5792

100_5804

100_5812