
4/11/15


DT1 MX project
Now to bodywork the tank and get it ready for paint. Here is the body filler, self etching primer, and denatured alcohol.

3M sandpaper.

I use Meguiar's backing pads for the sandpaper.

I cut up a plastic coffee can for mixing and spreading the filler.

First the tank is wiped down with the alcohol to clean it, and gets wiped down in between the processes.

Since I had sandblasted the tank, I hit it with some sandpaper which highlights any low spots. Here are a couple on the top.

Here is the biggest dent on the front.

Here is one above the left tank badge. Sometimes dents can have high spots around the edges, and if so they can be tapped down with a body hammer.

Now it is ready for body filler.

I use a metal file on the filler before it completely sets up to reduce the amount of sanding later. You just lightly go over the filler to take off things like ridges left from the spreader.

I use 220 grit on the filler once it is set. Sometimes you'll need to put on more filler, and keep working an area, using your fingertips for feel of how it's going.

After the body filler is good, then a coat of the self etching primer.

Lastly wet sand the primer using 400 grit and look for any areas that need more work. If you break through to bare metal just spot in with more primer. Even something like a tiny pin hole in the filler that the primer didn't fill will look like a moon crater once the paint goes on, so this is where you want to get up close and nit-picky. Once it is all good it is ready for paint.

3M sandpaper.
I use Meguiar's backing pads for the sandpaper.
I cut up a plastic coffee can for mixing and spreading the filler.
First the tank is wiped down with the alcohol to clean it, and gets wiped down in between the processes.
Since I had sandblasted the tank, I hit it with some sandpaper which highlights any low spots. Here are a couple on the top.
Here is the biggest dent on the front.
Here is one above the left tank badge. Sometimes dents can have high spots around the edges, and if so they can be tapped down with a body hammer.
Now it is ready for body filler.
I use a metal file on the filler before it completely sets up to reduce the amount of sanding later. You just lightly go over the filler to take off things like ridges left from the spreader.
I use 220 grit on the filler once it is set. Sometimes you'll need to put on more filler, and keep working an area, using your fingertips for feel of how it's going.
After the body filler is good, then a coat of the self etching primer.
Lastly wet sand the primer using 400 grit and look for any areas that need more work. If you break through to bare metal just spot in with more primer. Even something like a tiny pin hole in the filler that the primer didn't fill will look like a moon crater once the paint goes on, so this is where you want to get up close and nit-picky. Once it is all good it is ready for paint.
4/5/15
DT1 MX and RT1 projects
'68 to '71 DT1 seats can be difficult to find, and I needed two of them, one for the current '69 DT1 project and one for the '70 RT1 I'm collecting parts for. I finally managed to get them, or at least one and a half of them.
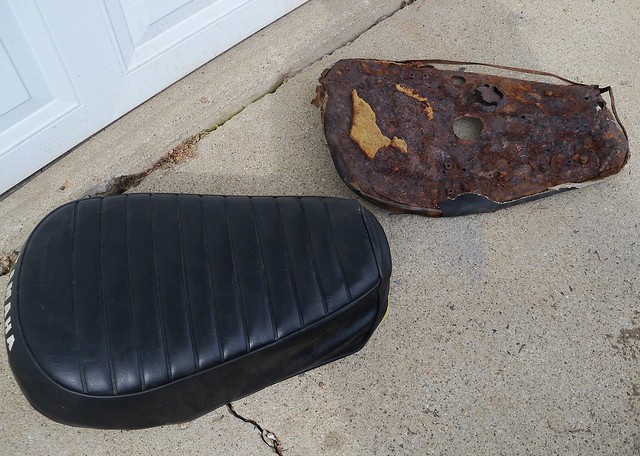
Seat #1 is the nicer one with the cover, and I got lucky on that one. It was listed in an ebay auction with a CT1 seat. I was the only bidder, so got it for the opening bid of $27.99, which is a super deal for one of these. It looks like and older recover on a original foam. Other than being partially untucked, the cover wasn't in too bad of shape. Seat #2 is badly rusted, but I'm just glad to have one to work with. I noticed a seller on ebay listing a bunch of DT1 parts, including seat brackets, but no seat pan. I contacted them and asked if they would be listing the pan, and they replied it was in far too bad of shape to sell. I said if it was basically intact I'd be interested, and they sent pictures. After seeing the pictures I told them I'd do a $25 'buy it now', so they did a listing.

The RT1 is just in mock-up, but I figured I just do both seats at the same time. These were left bare metal on the top from the factory, so seat #1 has relatively light rust for one of these. Seat #2 has the provision for a prop rod, so it is a '71 pan. '68 to '70 just used a strap.

Seat #1 did have some cracks to fix and weld nuts to replace. It also needed straitened out a bit, but overall a nice pan.

If you even touched seat #2 giant chunks of rust would fall off.

I hit seat #2 with the sandblaster to see how bad is was. The good news, the hinge (right) side of the pan was actually half way solid still. I've see worse DT1 pans saved. You can fix it with steel, fiberglass, or a combination of the two. I choose a combination.

I used seat #1 to make a new left side rail for pan #2. I first traced the front of the pan on some sheet metal, and then rolled the pan back while tracing the rear. This got me a curved piece that just needed some minor shaping to fit the pan.

Here is the new side. This way I'll have something to attach the upholstery clips to.

To make the upholstery clips I first cut a strip of thin sheet metal.

Then the end is rounded off.

Use pliers to put a bend on the end.

Next is to loop it around with needle nose pliers.

Finally snip it off.

I needed a few.

Here is one of mine with an original. To attach these drill a hole in the side of the pan and weld it from the outside.

Here is pan #2 with the new side and clips, and cleaned up ready for the fiberglass. There wasn't much to weld it to, so I had to do small spot welds, and basically stitch it on as good as I could.

I used blue painters tape to cover the holes. I used modeling compound (also known as Play-Doh) and took a mold from seat #1 to fill some of the bigger areas.

I did the fiberglass in small sections. It's a bit easier to work with that way.

Cured.

Here is what the bottom looked like. Pretty colors.

Here it is trimmed, and only holes where there are supposed to be holes. It is lighter, and I'd think maybe stronger than pan #1.

Pan #1 and #2 ready for paint.

I used Dupli-Color self-etching primer and gloss black paint.


Next is to install the rubber dampers and edge protector. I bought a 10' roll of vinyl tubing, and slit one side for the edge protector.

For seat #1 I put back the cover and foam that came on it. It is for the RT1.

The RT1 is just in mock-up/parts gathering stage at this time, but it's happy to have a seat.

Seat #2 is going on the DT1 MX project. I bought a new foam from KDI Reproductions ebay store (or go here: http://www.kdirepros.com/) and a new cover from Pit Replica.

I think it looks awesome. From rust to glory.


Seat #1 is the nicer one with the cover, and I got lucky on that one. It was listed in an ebay auction with a CT1 seat. I was the only bidder, so got it for the opening bid of $27.99, which is a super deal for one of these. It looks like and older recover on a original foam. Other than being partially untucked, the cover wasn't in too bad of shape. Seat #2 is badly rusted, but I'm just glad to have one to work with. I noticed a seller on ebay listing a bunch of DT1 parts, including seat brackets, but no seat pan. I contacted them and asked if they would be listing the pan, and they replied it was in far too bad of shape to sell. I said if it was basically intact I'd be interested, and they sent pictures. After seeing the pictures I told them I'd do a $25 'buy it now', so they did a listing.
The RT1 is just in mock-up, but I figured I just do both seats at the same time. These were left bare metal on the top from the factory, so seat #1 has relatively light rust for one of these. Seat #2 has the provision for a prop rod, so it is a '71 pan. '68 to '70 just used a strap.
Seat #1 did have some cracks to fix and weld nuts to replace. It also needed straitened out a bit, but overall a nice pan.
If you even touched seat #2 giant chunks of rust would fall off.
I hit seat #2 with the sandblaster to see how bad is was. The good news, the hinge (right) side of the pan was actually half way solid still. I've see worse DT1 pans saved. You can fix it with steel, fiberglass, or a combination of the two. I choose a combination.
I used seat #1 to make a new left side rail for pan #2. I first traced the front of the pan on some sheet metal, and then rolled the pan back while tracing the rear. This got me a curved piece that just needed some minor shaping to fit the pan.
Here is the new side. This way I'll have something to attach the upholstery clips to.
To make the upholstery clips I first cut a strip of thin sheet metal.
Then the end is rounded off.
Use pliers to put a bend on the end.
Next is to loop it around with needle nose pliers.
Finally snip it off.
I needed a few.
Here is one of mine with an original. To attach these drill a hole in the side of the pan and weld it from the outside.
Here is pan #2 with the new side and clips, and cleaned up ready for the fiberglass. There wasn't much to weld it to, so I had to do small spot welds, and basically stitch it on as good as I could.
I used blue painters tape to cover the holes. I used modeling compound (also known as Play-Doh) and took a mold from seat #1 to fill some of the bigger areas.
I did the fiberglass in small sections. It's a bit easier to work with that way.
Cured.
Here is what the bottom looked like. Pretty colors.
Here it is trimmed, and only holes where there are supposed to be holes. It is lighter, and I'd think maybe stronger than pan #1.
Pan #1 and #2 ready for paint.
I used Dupli-Color self-etching primer and gloss black paint.
Next is to install the rubber dampers and edge protector. I bought a 10' roll of vinyl tubing, and slit one side for the edge protector.
For seat #1 I put back the cover and foam that came on it. It is for the RT1.
The RT1 is just in mock-up/parts gathering stage at this time, but it's happy to have a seat.
Seat #2 is going on the DT1 MX project. I bought a new foam from KDI Reproductions ebay store (or go here: http://www.kdirepros.com/) and a new cover from Pit Replica.
I think it looks awesome. From rust to glory.
4/3/15

Subscribe to:
Posts (Atom)